


Creating Services by Exposing Ports
kubectl expose Command to expose a resource as a new Kubernetes service . That resource can be deployment , another Service, a ReplicaSet , a Replication Controller or a Pod .
lets see in action
kubectl create deployment internal-deployment --image=nginx --replicas=2
here we created deployment of --image=nginx with 2 replicaset --replicas=2
check pods
kubectl get pods
Expose the internal-deployment using ClusterIP:
ClusterIP (the default type) exposes the port only inside the cluster. Such a port would not be accessible from anywhere outside. ClusterIP is useful when we want to enable communication between Pods and still prevent any external access.
If NodePort is used, ClusterIP will be created automatically
$ kubectl expose deployment internal-deployment --port=80 --target-port=8008 --name=internal-service
The service is named internal-service, and is on the target port of 8008. As you can see, the type of IP is ClusterIP over TCP protocol, which is the default of the kubectl expose command:
kubectl describe service internal-service
To access the pods with ClusterIP, you can run a BusyBox curl container, then run nslookup for the internal service. If the service is discoverable, this confirms that the pods are available from inside the cluster:
kubectl run curl --image=radial/busyboxplus:curl -i --tty
run nslookup
ns lookup internal-service
expose the external deployment as a NodePort service, you can specify the type as NodePort
kubectl expose deployment external-deployment --port=80 --target-port=8000 --name=external-service --type=NodePort
you can see the details of external-service using the following command:
kubectl describe service external-service
LoadBalancer service that will help demonstrate how load balancing works. You can expose the pods from the external deployment using this load balancer. The IP address for the load balancer can be given as the actual IP of the computing service hosting the load balancer.
The LoadBalancer type is only useful when combined with cloud provider’s load balancer.
kubectl expose deployment external-deployment --port=80 --target-port=8000 --name=lb-service --type=LoadBalancer
Types Of Kubernetes Services
ClusterIP
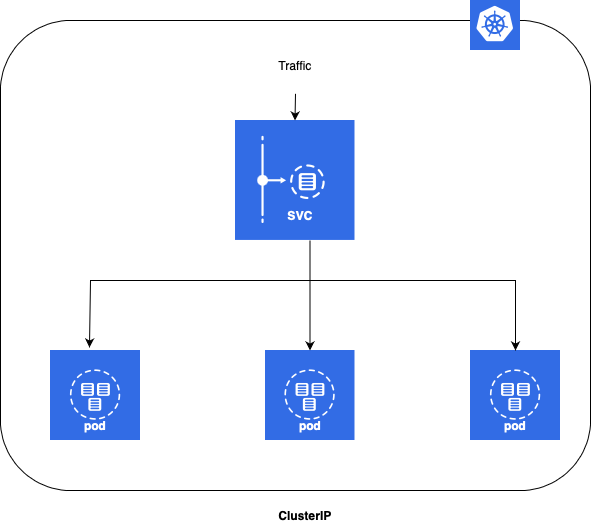
- ClusterIP is the default and most common service type.
- Kubernetes will assign a cluster-internal IP address to ClusterIP service. This makes the service only reachable within the cluster.
- You cannot make requests to service (pods) from outside the cluster.
- You can optionally set cluster IP in the service definition file. Use Cases
- Inter service communication within the cluster. For example, communication between the front-end and back-end components of your app.
apiVersion: v1
kind: Service
metadata:
  name: my-backend-service
spec:
  type: ClusterIP # Optional field (default)
  clusterIP: 10.10.0.1 # within service cluster ip range
  ports:
  - name: http
    protocol: TCP
    port: 80
    targetPort: 8080
NodePort

- NodePort service is an extension of ClusterIP service. A ClusterIP Service, to which the NodePort Service routes, is automatically created.
- It exposes the service outside of the cluster by adding a cluster-wide port on top of ClusterIP.
- NodePort exposes the service on each Node’s IP at a static port (the NodePort). Each node proxies that port into your Service. So, external traffic has access to fixed port on each Node. It means any request to your cluster on that port gets forwarded to the service.
- You can contact the NodePort Service, from outside the cluster, by requesting :.
- Node port must be in the range of 30000–32767. Manually allocating a port to the service is optional. If it is undefined, Kubernetes will automatically assign one. If you are going to choose node port explicitly, ensure that the port was not already used by another service.
Use Cases
- When you want to enable external connectivity to your service.
- Using a NodePort gives you the freedom to set up your own load balancing solution, to configure environments that are not fully supported by Kubernetes, or even to expose one or more nodes’ IPs directly.
- Prefer to place a load balancer above your nodes to avoid node failure.
Example
apiVersion: v1
kind: Service
metadata:
  name: my-frontend-service
spec:
  type: NodePort
  selector:
    app: web
  ports:
  - name: http
    protocol: TCP
    port: 80
    targetPort: 8080
    nodePort: 30000 # 30000-32767, Optional field
LoadBalancer
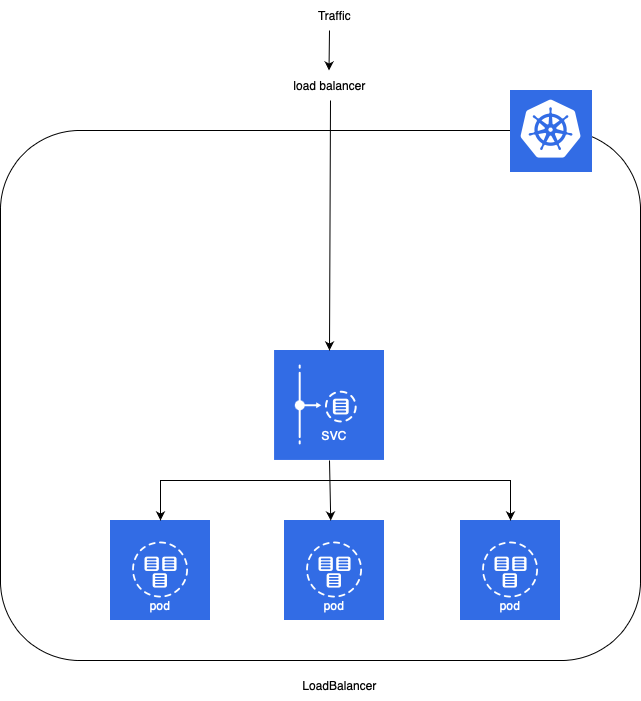
- LoadBalancer service is an extension of NodePort service. NodePort and ClusterIP Services, to which the external load balancer routes, are automatically created.
- It integrates NodePort with cloud-based load balancers.
- It exposes the Service externally using a cloud provider’s load balancer.
- Each cloud provider (AWS, Azure, GCP, etc) has its own native load balancer implementation. The cloud provider will create a load balancer, which then automatically routes requests to your Kubernetes Service.
- Traffic from the external load balancer is directed at the backend Pods. The cloud provider decides how it is load balanced.
- The actual creation of the load balancer happens asynchronously.
- Every time you want to expose a service to the outside world, you have to create a new LoadBalancer and get an IP address.
Use Cases
When you are using a cloud provider to host your Kubernetes cluster.
apiVersion: v1
kind: Service
metadata:
  name: my-frontend-service
spec:
  type: LoadBalancer
  clusterIP: 10.0.171.123
  loadBalancerIP: 123.123.123.123
  selector:
    app: web
  ports:
  - name: http
    protocol: TCP
    port: 80
    targetPort: 8080
ExternalName
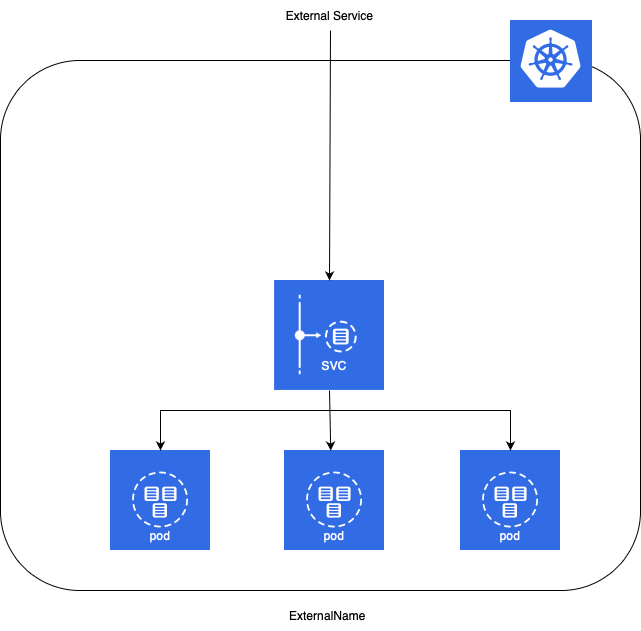
- Services of type ExternalName map a Service to a DNS name, not to a typical selector such as my-service.
- You specify these Services with the
spec.externalNameparameter. - It maps the Service to the contents of the externalName field (e.g. foo.bar.example.com), by returning a CNAME record with its value.
- No proxying of any kind is established.
Use Cases
- This is commonly used to create a service within Kubernetes to represent an external datastore like a database that runs externally to Kubernetes.
- You can use that ExternalName service (as a local service) when Pods from one namespace to talk to a service in another namespace.
apiVersion: v1
kind: Service
metadata:
  name: my-service
spec:
  type: ExternalName
  externalName: my.database.example.com
Sequential Breakdown of the process - Services
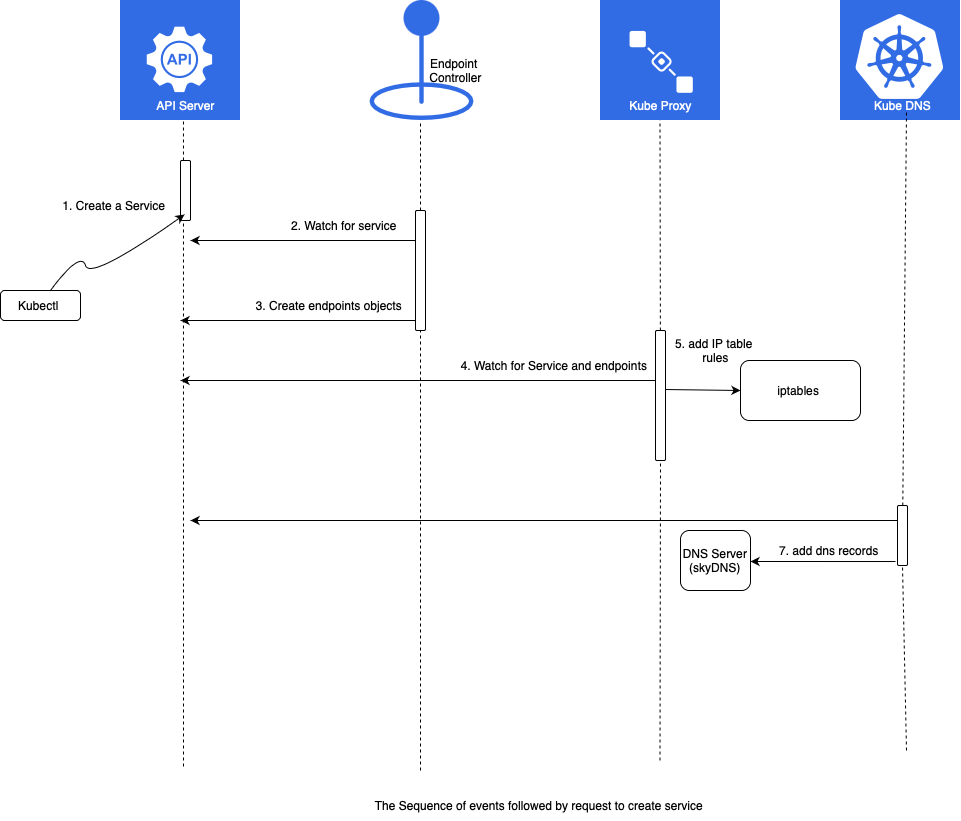
The processes that were initiated with the creation of the Service are as follows:
Kubernetes client (kubectl) sent a request to the API server requesting the creation of the Service based on Pods created through the ReplicaSet.
Endpoint controller is watching the API server for new service events. It detected that there is a new Service object.
Endpoint controller created endpoint objects with the same name as the Service, and it used Service selector to identify endpoints
kube-proxy is watching for service and endpoint objects. It detected that there is a new Service and a new endpoint object.
kube-proxy added iptables rules which capture traffic to the Service port and redirect it to endpoints. For each endpoint object, it adds iptables rule which selects a Pod.
The kube-dns add-on is watching for Service. It detected that there is a new service.
The kube-dns add record to the dns server (skydns).
Quick notes
kind: Service
apiVersion: v1
metadata:
  # Unique key of the Service instance
  name: service-example
spec:
  ports:
    # Accept traffic sent to port 80
    - name: http
      port: 80
      targetPort: 80
  selector:
    # Loadbalance traffic across Pods matching
    # this label selector
    app: nginx
  # Create an HA proxy in the cloud provider
  # with an External IP address - *Only supported
  # by some cloud providers*
  type: LoadBalancer

apiVersion: v1
kind: Service
metadata:
  name: hello-svc
  labels:
    app: hello-world
spec:
  type: NodePort
  ports:
  - port: 8080
    nodePort: 30001
    protocol: TCP
  selector:
    app: hello-world


apiVersion: v1
kind: Service
metadata:
  name: helloworld-service
spec:
  ports:
  - port: 31001
    nodePort: 31001
    targetPort: nodejs-port
    protocol: TCP
  selector:
    app: helloworld
  type: NodePort


apiVersion: v1
kind: Service
metadata:
  name: helloworld-service
spec:
  ports:
  - port: 80
    targetPort: nodejs-port
    protocol: TCP
  selector:
    app: helloworld
  type: LoadBalancer

apiVersion: v1
kind: Service
metadata:
  name: helloworld-nginx-service
spec:
  ports:
  - port: 80
    protocol: TCP
  selector:
    app: helloworld-nginx
  type: NodePort

apiVersion: v1
kind: Service
metadata:
  name: hello-svc
  labels:
    app: hello-world
spec:
  type: NodePort
  ports:
  - port: 8080
    nodePort: 30001
    protocol: TCP
  selector:
    app: hello-world

apiVersion: v1
kind: Service
metadata:
  name: hello-svc
  labels:
    app: hello-world
spec:
  type: NodePort
  ports:
  - port: 80
    nodePort: 30001
    protocol: TCP
  selector:
    app: hello-world