


Table of contents
- Getting Started with Deploying Releases
- Deploying Releases
- Why Zero Downtime?
- Kubernetes Deployments
- Deploying New Releases
- Looking into the Definition
- Updating Deployments
- Zero Downtime with Rolling and Recreate Updates
- Zero Downtime with Rolling Updates
- Upgrading Your Deployments
- Testing the Deployment strategy
- Blue/Green Release Strategy
- Testing the Blue/Green Deployment
- Canary Deployment Strategy
- Canary Testing Using Kubernetes Deployments And Services
- Testing the Canary deployment
Getting Started with Deploying Releases
Deploying Releases
- In today’s competitive environment, we have to release features to production as soon as they are developed and tested. The need for frequent releases fortifies the need for zero-downtime deployments.
- We learned how to deploy our applications packaged as Pods, how to scale them through ReplicaSets, and how to enable communication through Services. However, all that is useless if we cannot update those applications with new releases. That is where Kubernetes Deployments come in handy.
- The desired state of our applications is changing all the time. The most common reasons for new states are new releases. The process is relatively simple. We make a change and commit it to a code repository. We build it, and we test it. Once we’re confident that it works as expected, we deploy it to a cluster.
- It does not matter whether that deployment is to a development, test, staging, or production environment. We need to deploy a new release to a cluster, even when that is a single-node Kubernetes running on a laptop. No matter how many environments we have, the process should always be the same or, at least, as similar as possible.
Why Zero Downtime?
- The deployment must produce no downtime. It does not matter whether it is performed on a testing or a production cluster. Interrupting consumers is disruptive, and that leads to loss of money and confidence in a product.
- Gone are the days when users did not care if an application sometimes did not work. There are so many competitors out there that a single bad experience might lead users to another solution. With today’s scale, 0.1% of failed requests is considered disastrous.
- While we might never be able to reach 100% availability, we should certainly not cause downtime ourselves and must minimize other factors that could cause downtime.
Kubernetes Deployments
- provide us with the tools we need to avoid such
- failures by allowing us to update our applications without downtime.
- Let’s explore how Kubernetes Deployments work and the benefits we gain by adopting them.
Deploying New Releases
Just as we are not supposed to create Pods directly but using other controllers like ReplicaSet, we are not supposed to create ReplicaSets either. Kubernetes Deployments will create them for us. If you’re wondering why is this so? You’ll have to wait a little while longer to find out. First, we’ll create a few Deployments and, once we are familiar with the process and the outcomes, it’ll become obvious why they are better at managing ReplicaSets than we are.
Looking into the Definition
// deploy.yml
kind: Deployment
apiVersion: extensions/v1beta1
metadata:
  name: nginx-deployment
spec:
  # A deployment's specification really only
  # has a few useful options

  # 1. How many copies of each pod do we want?
  replicas: 3

  # 2. How do want to update the pods?
  strategy: Recreate

  # 3. Which pods are managed by this deployment?
  selector:
    # This must match the labels we set on the pod!
    matchLabels:
      deploy: example

  # This template field is a regular pod configuration
  # nested inside the deployment spec
  template:
    metadata:
      # Set labels on the pod.
      # This is used in the deployment selector.
      labels:
        deploy: example
    spec:
      containers:
        - name: nginx
          image: nginx:1.7.9
We will regularly add --record to the kubectl create commands. This allows us to track each change to our resources such as a Deployments
kubectl create \
    -f deploy.yml \
    --record
kubectl get -f deploy.yml
Describing the Deployment
kubectl describe -f deploy.yml
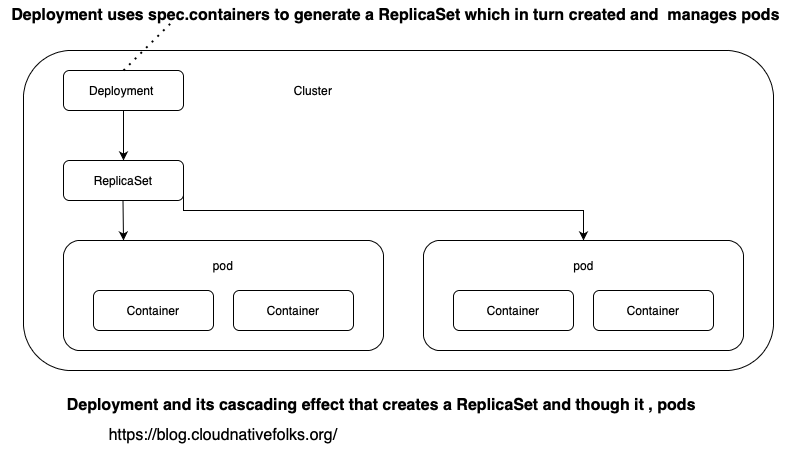
From the Events section, we can observe that the Deployment created a ReplicaSet. Or, to be more precise, that it scaled it. That is interesting. It shows that Deployments control ReplicaSets. The Deployment created the ReplicaSet which, in turn, created Pods. Let’s confirm that by retrieving the list of all the objects.
kubectl get all
you might be wondering why we created the Deployment at all. You might think that we’d have the same result if we created a ReplicaSet directly. You’d be right. So far, from the functional point of view, there is no difference between a ReplicaSet created directly or using a Deployment.
The following figure summarizes the cascading effect of deployments resulting in the creation of pods, containers, and replicaSets.
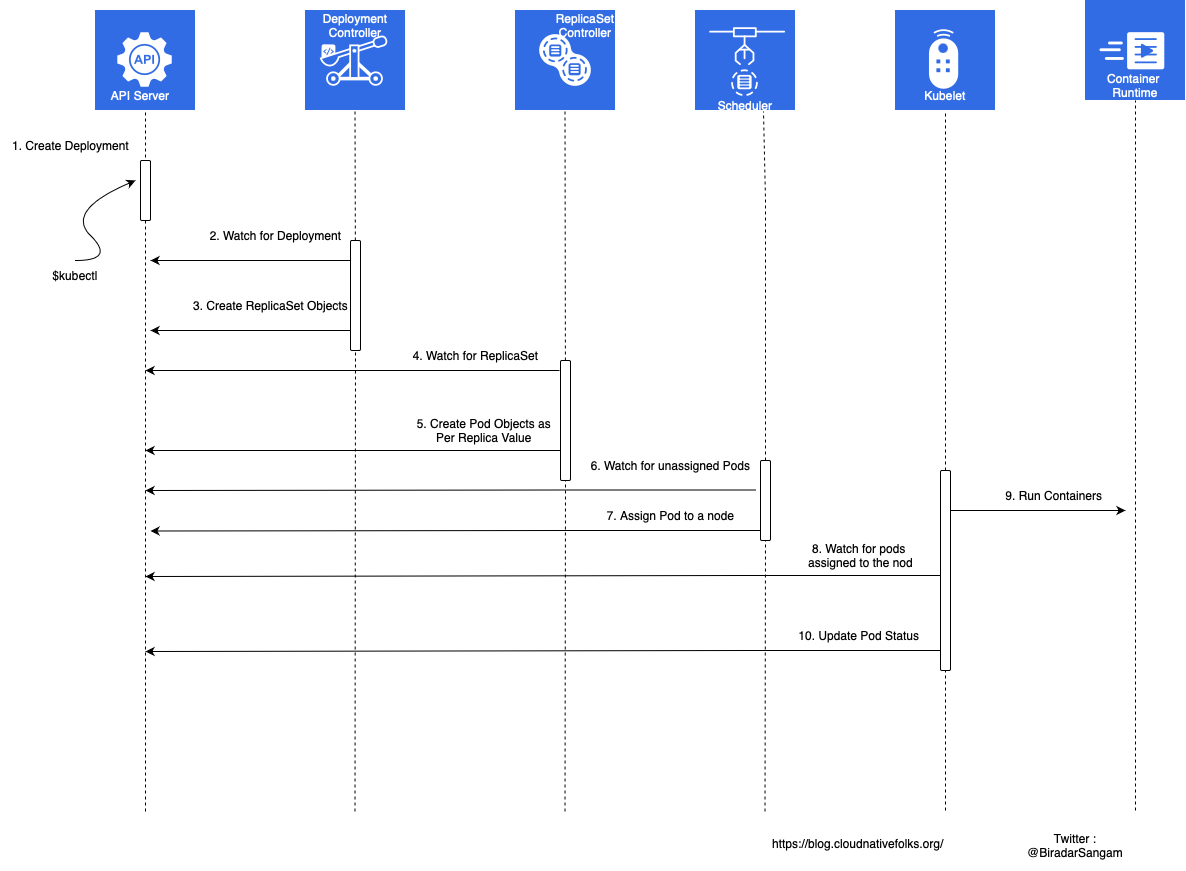
Sequential Breakdown of the Process- breakdown of the Kubernetes Deployment process.
Updating Deployments
Updating the nginx Image
Let’s see what happens when we set a new image to the Pod. ref
kubectl create \
    -f deploy.yml \
    ngnix = nginx:1.8.0
    --record
kubectl get -f deploy.yml
It’ll take a while until the new image is pulled.
Describing the Deployment
Once it’s done, we can describe the Deployment by checking the events it created.
kubectl describe -f deploy.yml
Looking into the Cluster
To be on the safe side, we might want to retrieve all the objects from the cluster.
kubectl get all
Exploring Ways to Update Deployment
Updating Using Commands
The kubectl set image command is not the only way to update a Deployment. We could also have used as well. The kuectl edit command would be as follows.
The command would be as follows.
kubectl edit -f deploy.yml
Please do NOT execute it. If you do, you’ll need to type :q followed by the enter key to exit.
The above edit command is not a good way to update the definition. It is unpractical and undocumented.
The kubectl set image is more useful if we’d like to integrate Deployment updates with one of the CI/CD tools.
Updating the YAML File
Another alternative would be to update the YAML file and execute the kuectl apply command. While that is a good idea for applications that do not update
frequently, it does not fit well with those that change weekly, daily, or even hourly.
nginx is one of those that might get updated with a new release only a couple of times a year so having an always up-to-date YAML file in your source code repository is an excellent practice.
Finishing off
We used kubectl set image just as a way to introduce you to what’s coming
next when we explore frequent deployments without downtime.
A simple update of Pod images is far from what Deployment offers. To see its real power, we should deploy the API. Since it can be scaled to multiple Pods, it’ll provide us with a much better playground.
Zero Downtime with Rolling and Recreate Updates
We create three Dockerfiles as follows:
Dockerfile_1:
//DockerFile.v1
FROM nginx:latest
COPY v1.html /usr/share/nginx/html/index.html
Dockerfile_2:
//DockerFile.v2
FROM nginx:latest
COPY v2.html /usr/share/nginx/html/index.html
Dockerfile_3:
//DockerFile.v3
FROM nginx:latest
COPY v3.html /usr/share/nginx/html/index.html
The HTML files are as follows:
v1.html
<!DOCTYPE html>
<html lang="en">
<head>
    <meta charset="UTF-8">
    <meta name="viewport" content="width=device-width, initial-scale=1.0">
    <meta http-equiv="X-UA-Compatible" content="ie=edge">
    <title>Release 1</title>
</head>
<body>
    <h1>This is release #1 of the application</h1>
</body>
</html>
v2.html
<!DOCTYPE html>
<html lang="en">
<head>
    <meta charset="UTF-8">
    <meta name="viewport" content="width=device-width, initial-scale=1.0">
    <meta http-equiv="X-UA-Compatible" content="ie=edge">
    <title>Release 2</title>
</head>
<body>
    <h1>This is release #2 of the application</h1>
</body>
</html>
v3.html
<!DOCTYPE html>
<html lang="en">
<head>
    <meta charset="UTF-8">
    <meta name="viewport" content="width=device-width, initial-scale=1.0">
    <meta http-equiv="X-UA-Compatible" content="ie=edge">
    <title>Release 2</title>
</head>
<body>
    <h1>This is release #3 of the application</h1>
</body>
</html>
Finally, we need to build and push those images:
docker build -t sangam14/mywebserver:1 -f Dockerfile_1 .
docker build -t sangam14/mywebserver:2 -f Dockerfile_2 .
docker build -t sangam14/mywebserver:3 -f Dockerfile_3 .
docker push YOUR_DOCKER_HUB_USERNAME/mywebserver:1
docker push YOUR_DOCKER_HUB_USERNAME/mywebserver:2
docker push YOUR_DOCKER_HUB_USERNAME/mywebserver:3
Zero Downtime with Rolling Updates
Let’s create a Deployment for running v1 for our web server. Create a YAML file called nginx_deployment.yaml and add the following:
---
apiVersion: v1
kind: Service
metadata:
  name: mywebservice
spec:
  selector:
    app: nginx
  ports:
    - protocol: TCP
      port: 80
      targetPort: 80
  type: NodePort
---
apiVersion: apps/v1
kind: Deployment
metadata:
  name: mywebserver
spec:
  replicas: 4
  strategy:
    type: RollingUpdate
    rollingUpdate:
      maxSurge: 1
      maxUnavailable: 1
  selector:
    matchLabels:
      app: nginx
  template:
    metadata:
      labels:
        app: nginx
    spec:
      containers:
      - image: YOUR_DOCKER_HUB_USERNAME/mywebserver:1
        name: nginx
        readinessProbe:
          httpGet:
            path: /
            port: 80
            httpHeaders:
            - name: Host
              value: K8sProbe
Let’s deploy the Service and the Deployment to see that in action:
kubectl apply -f nginx_deployment.yaml
Now, let’s ensure that our Pods are in the running state:
$ kubectl get pods
NAME                           READY   STATUS    RESTARTS   AGE
mywebserver-68cd66868f-78jgt   1/1     Running   0          5m29s
mywebserver-68cd66868f-kdxx9   1/1     Running   0          29m
mywebserver-68cd66868f-lh6wz   1/1     Running   0          29m
mywebserver-68cd66868f-vvqrh   1/1     Running   0          5m29s
If we want to actually see the contents of the web page nginx is serving, we need to know the port that the Service is listening at:
$ kubectl get svc
NAME           TYPE        CLUSTER-IP     EXTERNAL-IP   PORT(S)        AGE
kubernetes     ClusterIP   10.96.0.1              443/TCP        2d10h
mywebservice   NodePort    10.107.1.198           80:32288/TCP   32m
Our mywebservice Service is using port 32288 to route traffic to the Pod on port 80. If you navigate to node_ip:3288
Upgrading Your Deployments
There is more than one way to update a running Deployment, one of them is modifying the definition file to reflect the new changes and applying it using kubectl
Change the .spec.template.spec.containers[].image in the definition file to look as follows:
spec:
      containers:
      - image: YOUR_DOCKER_HUB_USERNAME/mywebserver:2
Clearly, the only thing that changed is the image tag: we need to deploy the second version of our application. Apply the file using kubectl:
$ kubectl apply -f nginx_deployment.yaml
service/mywebservice unchanged
deployment.apps/mywebserver configured
Testing the Deployment strategy
$ kubectl get pods
NAME                           READY   STATUS              RESTARTS   AGE
mywebserver-68cd66868f-7w4fc   1/1     Terminating         0          83s
mywebserver-68cd66868f-dwknx   1/1     Running             0          94s
mywebserver-68cd66868f-mv9dg   1/1     Terminating         0          94s
mywebserver-68cd66868f-rpr5f   0/1     Terminating         0          84s
mywebserver-77d979dbfb-qt58n   1/1     Running             0          4s
mywebserver-77d979dbfb-sb9s5   1/1     Running             0          4s
mywebserver-77d979dbfb-wxqfj   0/1     ContainerCreating   0          0s
mywebserver-77d979dbfb-ztpc8   0/1     ContainerCreating   0          0s
$ kubectl get pods
NAME                           READY   STATUS        RESTARTS   AGE
mywebserver-68cd66868f-dwknx   0/1     Terminating   0          100s
mywebserver-77d979dbfb-qt58n   1/1     Running       0          10s
mywebserver-77d979dbfb-sb9s5   1/1     Running       0          10s
mywebserver-77d979dbfb-wxqfj   1/1     Running       0          6s
mywebserver-77d979dbfb-ztpc8   0/1     Running       0          6s
$ kubectl get pods
NAME                           READY   STATUS    RESTARTS   AGE
mywebserver-77d979dbfb-qt58n   1/1     Running   0          25s
mywebserver-77d979dbfb-sb9s5   1/1     Running   0          25s
mywebserver-77d979dbfb-wxqfj   1/1     Running   0          21s
mywebserver-77d979dbfb-ztpc8   1/1     Running   0          21s
maxSurge: the number of Pods that can be deployed temporarily in addition to the new replicas. Setting this to 1 means we can have a maximum total of five running Pods during the update process (the four replicas + 1).
maxUnavailable: the number of Pods that can be killed simultaneously during the update process. In our example, we can have at least three Pods running while the update is in progress (4 replicas - 1).

The RollingUpdate strategy is the default type, for a good reason. It allows us to deploy new releases without downtime. It creates a new ReplicaSet with zero replicas and, depending on other parameters, increases the replicas of the new one, and decreases those from the old one. The process is finished when the replicas of the new ReplicaSet entirely replace those from the old one
the new one, and decreases those from the old one. The process is finished when the replicas of the new ReplicaSet entirely replace those from the old one.
When RollingUpdate is the strategy of choice, it can be fine-tuned with the maxSurge and maxUnavailable fields. The former defines the maximum number of Pods that can exceed the desired number (set using replicas ). It can be set to an absolute number (e.g., 2 ) or a percentage (e.g., 35% )-. The total number of Pods will never exceed the desired number (set using replicas ) and the maxSurge combined. The default value is 25%
maxUnavailable defines the maximum number of Pods that are not operational. If, for example, the number of replicas is set to 15 and this field is set to 4, the minimum number of Pods that would run at any given moment would be 11. Just as the maxSurge field, this one also defaults to 25%. If this field is not specified, there will always be at least 75% of the desired Pods.
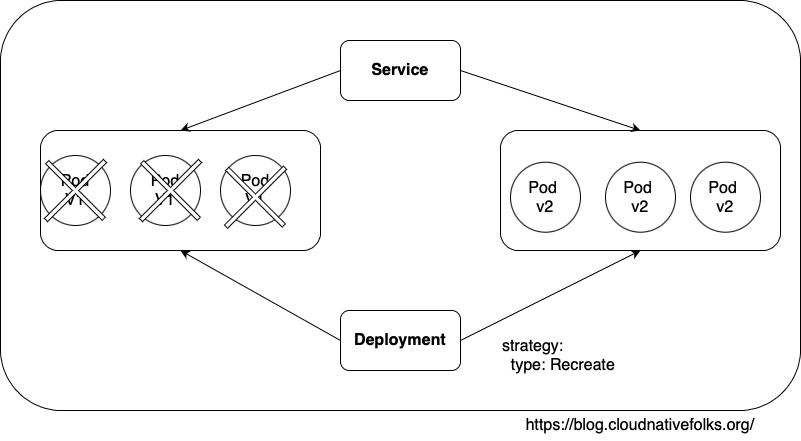
- Recreate resembles the processes we used in the past when the typical strategy for deploying a new release was first to stop the existing one and then put a new one in its place. This approach inevitably leads to downtime. The only case when this strategy is useful is when applications are not designed for two releases to coexist. Unfortunately, that is still more common than it should be. If you’re in doubt whether your application is like that, ask yourself the following question. Would there be an adverse effect if two different versions of my application are running in parallel? If that’s the case, a Recreate strategy might be a good choice and you must be aware that you cannot accomplish zero-downtime deployments.
Blue/Green Release Strategy
The Blue/Green deployment involves having two sets of identical hardware. The software application is deployed to both environments at the same time. However, only one of the environments receives live traffic while the other remains idle. When a new version of the application is ready, it gets deployed to the blue environment. The network is directed to the blue environment through a router or a similar mechanism. If problems are detected on the new release and a rollback is needed, the only action that should be done is redirecting traffic back to the green environment.
The advantages of this strategy are that - unlike rolling update - there is zero downtime during the deployment process, although there’s never more than one version of the application running at the same time.
The drawback, however, is that you need to double the resources hosting the application, which may increase your costs.
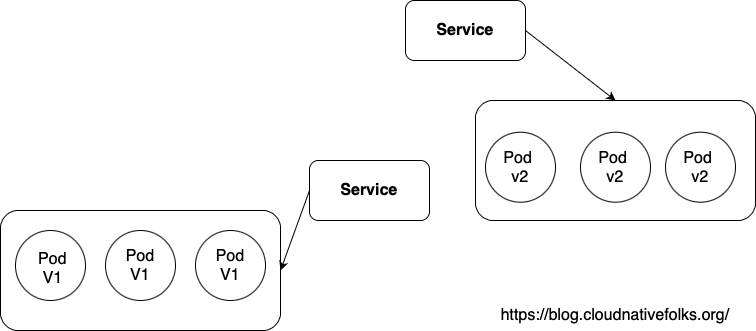
the idea is to create a second Deployment with the new application version (blue) while the original one is still running (green). Once all the Pods in the Blue deployment are ready, we instruct the Service to switch to the Blue deployment (by changing the Pod Selector appropriately). If a rollback is required, we shift the selector back to the green Pods. Let’s see how this can be done in our example.
First, let’s destroy the current Deployment:
kubectl delete deployment mywebserver
- lets create three files :-
- nginx_deployment_green.yaml
- nginx_deployment_blue.yaml
- Nginx_service.yaml
//nginx_deployment_green.yaml
---
apiVersion: apps/v1
kind: Deployment
metadata:
  name: mywebserver-green
spec:
  replicas: 4
  strategy:
    type: Recreate
  selector:
    matchLabels:
      app: nginx_green
  template:
    metadata:
      labels:
        app: nginx_green
    spec:
      containers:
      - image: YOUR_DOCKER_HUB_USERNAME/mywebserver:1
        name: nginx
The deployment is using v1 of our application. We also appended “-green” to the Pod tags and their selectors denoting that this is the green deployment. Additionally, the deployment name is mywebserver_green, indicating that this is the green deployment.
Notice that we’re using the Recreate deployment strategy. Using Recreate or RollingUpdate is of no significance here as we are not relying on the Deployment controller to perform the update.
//nginx_deployment_blue.yaml
---
apiVersion: apps/v1
kind: Deployment
metadata:
  name: mywebserver-blue
spec:
  replicas: 4
  strategy:
    type: Recreate
  selector:
    matchLabels:
      app: nginx_blue
  template:
    metadata:
      labels:
        app: nginx_blue
    spec:
      containers:
      - image: YOUR_DOCKER_HUB_USERNAME/mywebserver:2
        name: nginx
Our Service should be defined as follows:
---
apiVersion: v1
kind: Service
metadata:
  name: mywebservice
spec:
  selector:
    app: nginx_blue
  ports:
    - protocol: TCP
      port: 80
      targetPort: 80
  type: NodePort
Testing the Blue/Green Deployment
$ kubectl apply -f nginx_deployment_blue.yaml
deployment.apps/mywebserver-blue created
And the green one:
$ kubectl apply -f nginx_deployment_green.yaml
deployment.apps/mywebserver-green created
And finally the service:
$ kubectl apply -f nginx_service.yaml
service/mywebservice configured
Navigating to node_ip:32288 shows that we are using version 2 of our application. If we need to quickly rollback to version 1, we just change the Service definition in nginx_service.yaml to look as follows:
---
apiVersion: v1
kind: Service
metadata:
  name: mywebservice
spec:
  selector:
    app: nginx_green
  ports:
    - protocol: TCP
      port: 80
      targetPort: 80
  type: NodePort
Now, refreshing the web page shows that we have reverted to version 1 of our application. There was no downtime during this process. Additionally, we had only one version of our application running at any particular point in time.
Canary Deployment Strategy
Canary Deployment is a popular release strategy that focuses more on “testing the air” before going with the full deployment.
The name of Canary Deployment Strategy has its origins rooted back to coal miners. When a new mine is discovered, workers used to carry a cage with some Canary birds. They placed the cage at the mine entrance. If the birds die, that was an indication of toxic Carbon Monoxide gas emission.
So, what does coal mining have to do with software deployment? While the implementation is different (way to go, Canaries!), the concept remains the same. When software is released using a Canary deployment, a small subset of the incoming traffic is directed to the new application version while the majority remains routed to the old, stable version.
- The main advantage of this method is that you get customer feedback quickly on any new features your application offers. If things go wrong, you can easily route all the traffic to the stable version. If enough positive feedback is received, you can gradually increase the portion of traffic going to the new version until it reaches 100%.
Canary Testing Using Kubernetes Deployments And Services
Assuming that we are currently running version 1 of our application and we need to deploy version 2. We want to test some metrics like latency, CPU consumption under different load levels. We’re also collecting feedback from the users. If everything looks good, we do a full deployment.
We’re doing this the old-fashioned way for demonstration purposes, yet some tools, such as Istio, can automate this process.
The first thing we need to do it create two Deployment definition files; one of them uses version 1 of the image, and the other one uses version 2. Both Deployments use the same Pod labels and selectors. The files should look something like the following:
//nginx_deployment_stable.yaml:

---
apiVersion: apps/v1
kind: Deployment
metadata:
  name: mywebserver-stable
spec:
  replicas: 6
  strategy:
    type: Recreate
  selector:
    matchLabels:
      app: nginx
  template:
    metadata:
      labels:
        app: nginx
    spec:
      containers:
      - image: YOUR_DOCKER_HUB_USERNAME/mywebserver:1
        name: nginx
nginx_deployment_canary.yaml
---
apiVersion: apps/v1
kind: Deployment
metadata:
  name: mywebserver-canary
spec:
  replicas: 2
  strategy:
    type: Recreate
  selector:
    matchLabels:
      app: nginx
  template:
    metadata:
      labels:
        app: nginx
    spec:
      containers:
      - image: YOUR_DOCKER_HUB_USERNAME/mywebserver:2
        name: nginx
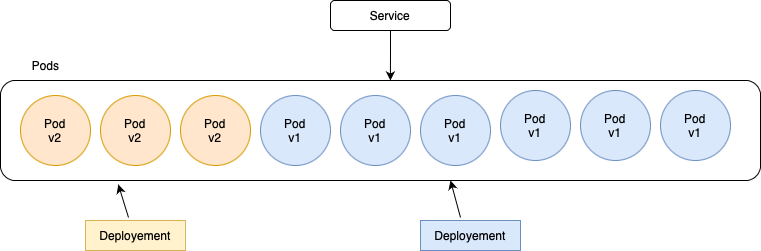
Both files look identical except for the Deployment name and the Pod image. Notice that we set the number of replicas on the “stable” deployment to 6 while we’re deploying only 2 Pods on the Canary one. This is intentional; we need 25% only of our application to serve version 2 while the remaining 75% continues to serve version 1.
Testing the Canary deployment
$ kubectl apply -f nginx_deployment_stable.yaml
deployment.apps/mywebserver-stable created
$ kubectl apply -f nginx_deployment_canary.yaml
deployment.apps/mywebserver-canary created
$ kubectl apply -f nginx_service.yaml
service/mywebservice configured
If you refresh the web page node_port:32288 several times, you may occasionally see version 2 of the application shows.
- Increasing the percentage of users going to version 2 is as simple as increasing the replicas count on the Canary deployment and decreasing the replicas count on the stable one. If you need to rollback, you just set the number of replicas to be 8 (100%) on the stable Deployment and deleting the Canary Deployment. Alternatively, you can go ahead with the Canary Deployment be reversing this operation.